This manual covers the main equipment features only. While it also includes the procedure for saving and loading from the now long obsolete memory cards it does not mention the how to operate with the optional floppy drive interface so I am still at a loss about how to use this! Note that there is a separate manual covering the MIDI interface and programming via the keyboard, not included in this download. You will also need to get hold of this if you want to use the MIDI interface properly. Basically there is little difference between this manual and the free to download manual for the similar PR60 model.
Nothing wrong with the manual or the delivery - came to me the same day I ordered it. But afterwards I realized that I ordered the wrong manual. Probably better with the Quick start - version. So maybe it would be better if we could see a list with inhold for each manual before ordering?
Bought T4850 High End Tuner a few years ago, but i didn't know where all the buttons were used for. So i purchased the owners manual. Perfect! Just what i needed.
Text excerpt from page 18 (click to view)
Hardware Setup
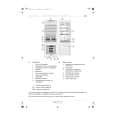
Front Panel Features The front panel of the MobilePre USB houses features providing the following functions: 1. Channel 1 Inst/Line Input Jack: This 1/4� balanced connector
accepts an instrument or line level signal for Channel 1 of the MobilePre USB. This input is ideal for recording guitar, bass or synthesizer. If you are recording a stereo line-level source, plug the left channel into Line Input 1 (on the front panel of the MobilePre USB) and the right channel into Line Input 2 (on the rear panel). 2. Channel 1 Gain Knob: This control knob regulates the level of the signal going from the Channel 1 Mic or Line input to your computer. 3. Channel 1 Level LEDs: These two LEDs show signal present and clipping of Channel 1 of the MobilePre USB.You should adjust the Gain control so that the signal present is on as much as possible but the Clip LED does not come on. 4. Channel 2 Gain Knob: This control knob regulates the level of the signal going from the Channel 2 Mic or Line input to your computer. 5. Channel 2 Level Meter: These two LEDs show when input signal into Channel 2 is present or clipping.You should adjust the Gain control so that the signal present is as high as possible without lighting the the Clip LED. 6. Headphone Output Jack: This 1/8� stereo jack plays back outputs 1 and 2 through the Left and Right speakers of your headphones. 7. Headphone Level Knob: This knob controls the level to the Headphone Out 8. Phantom Power Switch: Press this switch button into the In-position to send voltage to microphones which require phantom power and are connected to XLR Mic Inputs 1 and 2. 9. Phantom Power Indicator: This LED lights when phantom power is switched on. 10.Power Indicator: This LED indicator lights when the MobilePre USB is receiving power through its USB port.
18